
I know thing have been quiet around here lately, and that is due to the holidays and the family time that I have happening all around me (this really is the most wonderful time of the year), but I am sneaking in here with some exciting Christmas news.
![]() I have been given the best holiday gift this year…a design position on the digi design team over at Craftin Desert Divas. If you don’t know them you should. They create stamps and dies, but also have an extremely large gallery of digi stamps that you can get instantly.
I have been given the best holiday gift this year…a design position on the digi design team over at Craftin Desert Divas. If you don’t know them you should. They create stamps and dies, but also have an extremely large gallery of digi stamps that you can get instantly.
Today I am here to share with you two cards I made with one of their digis, Catty Hatty Birthday .  When we get back from holiday, I have two different teachers at my kiddos’ school who are having a birthday, and this digi just screams elementary teacher birthday to me.
Now I think when people think digis, they think there is only one way to work them. You print out the image onto some card stock, and then color them in with your markers or pencils. That is what I have done here with my copics. I wasn’t actually happy with my coloring at all in the back ground, and resorted to one of my favorite tricks. I pulled out my handy dandy white gelly roll pen and started doddling circles all over the place. And since the cat and the hat has always been a sketchy art piece, I think all those silly circles work. I added even more white gel pen to the cake, highlights to the bowl, the fish, the party hat, and even the cat’s hat. If you don’t have a good white gel pen, you must find one today. The white gel pen can help hide so many mistakes.
 However, as cute as the first card turned out, I was inspired by the digi to show you how to push digital stamping. Did you know that you can print out digis onto black card stock…(well at least my printer can)? Yes, the image is difficult to see, but you can still see it and with a little patience, you can color it in.
I pulled out my prismacolor colored pencils and started coloring in  the digi. I always start with the lightest color first when I am working on black card stock. I pulled out the white and went to town on all the white parts (you will noticed I missed several).
 When I need to color something in black on card stock like this, I always add some lighter grey to the image first, and then go back in and flick in some black color pencil.
Now that my main focal image had a good base coat I went in with 
the red, just to see how bright I was going to get. Now remember, you colored pencils might not turn out the exact shade you are expecting it to show as, so I always keep a scrape of black card stock on hand to test the colors first.
 After I had the cat looking pretty dapper I went to town on the cake. I decided to keep this card pretty simple in coloring so I chose to stick mainly with my primary colors. I added a bunch of bright yellow to the cake, and blue to the frosting. I went with too dark a blue however, a
 nd am kind of bummed with how the frosting turned out. (I fixed it later with my white gel pen)
Finally, I attacked the fish and his bowl, giving him several highlights with my white gel pen. In fact, I hit many different spots all over the card with gel pen to give it a bit of more detail since I kept the coloring so simple. 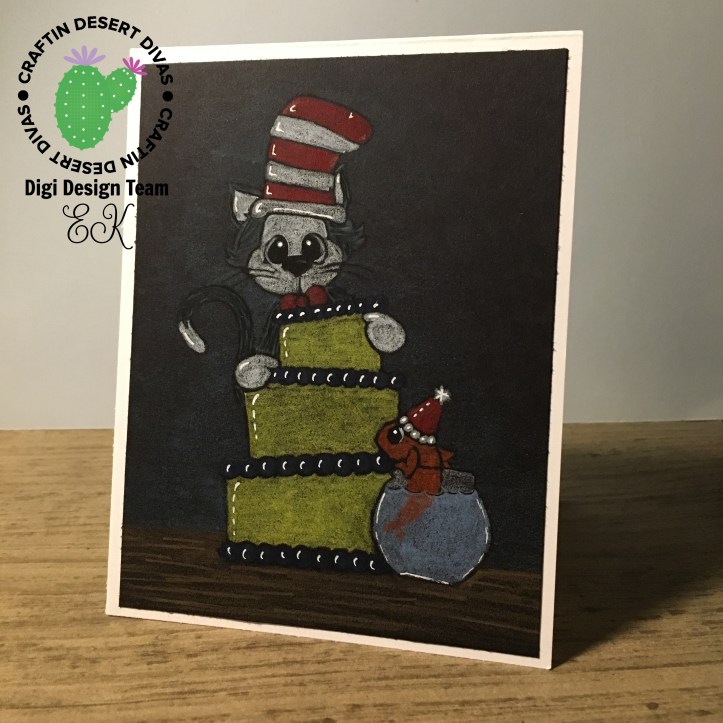
I just love how digital stamping comes out on dark card stock. Because the ink blends in with the back ground, the whole thing ends ups looking like you took the time to do no line coloring.
That’s all for today, and I hope you go experiment with new ways to play with your digi stamps.
